

This painted wooden lamp base is inspired by furniture-maker VOLK in Brooklyn, which hand-paints sun-washed colors in geometric patterns to adorn their beautiful wood furniture. Forever a fan of upcycling old wood, I set about making a lamp base from scratch for full creative control.
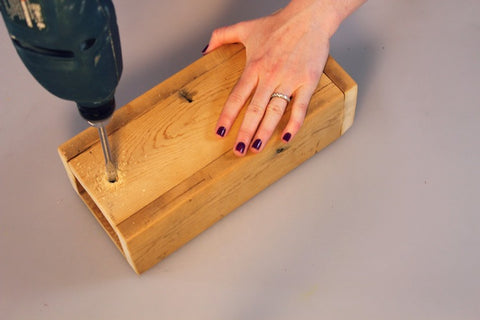
Determine what dimensions you want your finished lamp to be, and craft yourself a wooden box. Being an absolute woodworking novice, mine was hacked together the only way I knew how: wood glue! That stuff is amazing. Once dry and solid, sand the whole thing down liberally. Then drill 2 holes for the lamp cord: one at the bottom of the base as an exit hole and one on top for the socket.
Create your pattern with Frog Tape and paint away. Apply 2-3 coats.
What I wish I'd read before starting this project: this post on Vintage Revivals about how to paint furniture flawlessly. My lamp turned out great, but I can't wait to put Mandi's know-how to work on my next project.

Once the paint is dry, finish up with a coat of polyurethane to protect your work.

The fun part: wiring the lamp. The electrical lamp making kit includes very detailed instructions on how to wire up a lamp, so I won't go into those here. Suffice to say, wiring a lamp is truly not as difficult or scary as you may think. This part of the project took about 10 minutes.
I wanted my lamp to have a 'neck' - that nickel tubing between the base and the socket. This means that there is the option to put a lampshade on it later. Necks are not usually included in lamp kits, and depending on reader interest, I may create some neck kits for those that want to replicate this project at home - you can choose the length of the neck to customize the height of your lamp. I used a 12" neck in my project. Post in the comments below if you're interested!
If using a neck, you'll want to install this on your lamp base instead of the regular lamp 'nipple' included in your electrical lamp wiring kit. Then run the cord through the hole in the base, through the neck, and follow the instructions included in the kit.

The lamp base all wired up.

The finished lamp base - front and back view.

It looks good with a simple Edison bulb. But of course, I'm also looking forward to creating the perfect lampshade to finish it off. Stay tuned!

The electrical lamp kit I used in this project is available in 3 color variations (brass/gold, silver/nickel, and antique bronze/brown), as well as in varying lengths, and you can choose a pull-chain or knob switch. Check out the buying guide for the electrical light kit which makes it easy to figure out what type of kit you need for your project.

Overall, this geometric painted wooden lamp base is a perfect blend of form and function. It not only provides functional lighting but also serves as a work of art that enhances the aesthetics of any room. I would love to have one of these lamps in my home to add a touch of modern elegance!


Wooden Lamps
January 25, 2024
Thanks for sharing this inspiring project about Wooden Lamps! Your post has sparked my interest in trying my hand at a similar DIY venture. Looking forward to more of your creative ideas and tutorials!