
Designer lamps are fabulous, eye-catching and look so nice you just need to have them in your home. Unfortunately, as beautiful as they may be, forking out hundreds of dollars for one lighting fixture is just not practical for most of us. And believe us - we love lamps and we know that feeling when you see a cute Anthropologie lamp and you KNOW it’s going to fit perfectly in your living room, but not within your budget. Fortunately, you can update your home decor on a budget thanks to DIY solutions and make get the look of those beautiful designer lamps for a fraction of the cost.
In a previous “Get the Look for Less”, we gave you three DIY solutions to add a touch of Anthropologie & Pottery Barn sophistication to your own lampshades. And in today’s post, we brainstormed a DIY alternative to the gorgeous Jeeves hat table lamp designed by Jake Phipps.
Before we start, it’s worth to mention that our “Get the Look for Less” posts are meant only to show you the DIY alternatives, not inspire you to copy to the smallest detail a designer’s work.
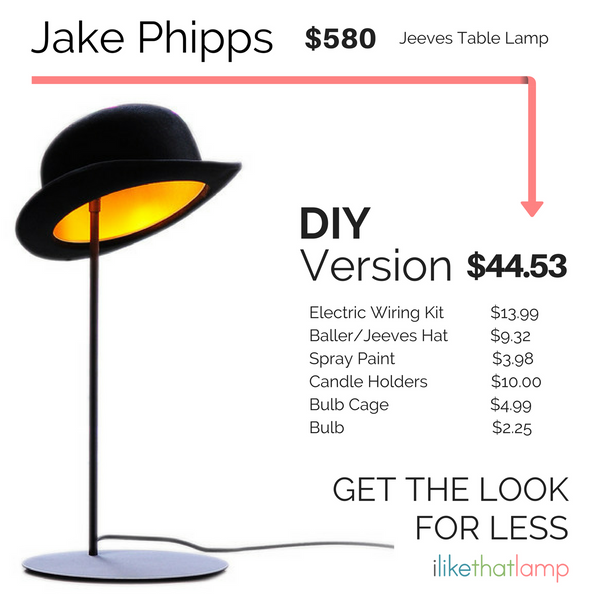
This pretty designer hat table lamp is priced at a whopping $580. If you like the idea but aren’t mentally ready to fork out hundreds of dollars on a lamp, you could make a DIY version that will only set you back $50.
Amazon is full of offers and if you like to hunt for the best deals, you can buy sets or packs to get a better price on your supplies and save money on your overall lamp project.
Get your supplies:

The fun thing when you’re DIY a lamp is that you can literally choose anything to use as a base. You can choose items from your own home: a log of wood, a mason jar, an old lamp base, a statuette, candle holders, a bottle and so on. If you’re into recycling, check out this post for dozens of old things that make awesome DIY lamps.
However, for this project, we took to Amazon to find something that would match the elegance and certain je-ne-sais-quoi of a bowler hat. So we browsed Amazon and found a couple of candle holders that could be spray painted in whatever color you’d like. They would also be easy to wire through. There are candle holders that need to be put together - some might be hollow in the middle and possibly have a metal rod to keep it all in one piece. If that’s the case, replace that rod with a straight pipe that is wide enough to accommodate the electrical wiring. You can find straight pipes at your local hardware store.
You can also use wood candle holders, but you’d need to drill a hole through the middle to make room for the wiring. If you’re not in the mood to drill holes, then you can use a bottle kit lamp instead and use one of the 3 adaptors to attach the socket to the base. Here’s how it would work. It also comes pre-assembled, so if you’re not the patient type, this could be the perfect fix.
The most affordable way to go, however, is to simply recycle an old lamp base you have around the house.
Step 1: Customize your lamp base (paint over it)
* If you are recycling an old lamp base that doesn’t require changing the wiring, you can either take out the electrical part or cover all the electrical parts with painter’s tape and then proceed to paint over it.
If you’re recycling a lamp base that’s already wired and isn’t faulty, skip step 2 & 3.
Step 2: Prepare your lamp base
If your lamp base allows it, drill a hole through it and add the wiring. You can also use a wire pipe to keep the wiring secured and add more stability to your base.
If your lamp base is too hard to drill through, you can use a bottle lamp kit instead of the standard electrical wiring kit.
Step 3: If you’re rewiring a lamp base from scratch and using a standard electrical wiring kit, check out these tutorials to learn how to put all the elements together without electrocuting yourself:
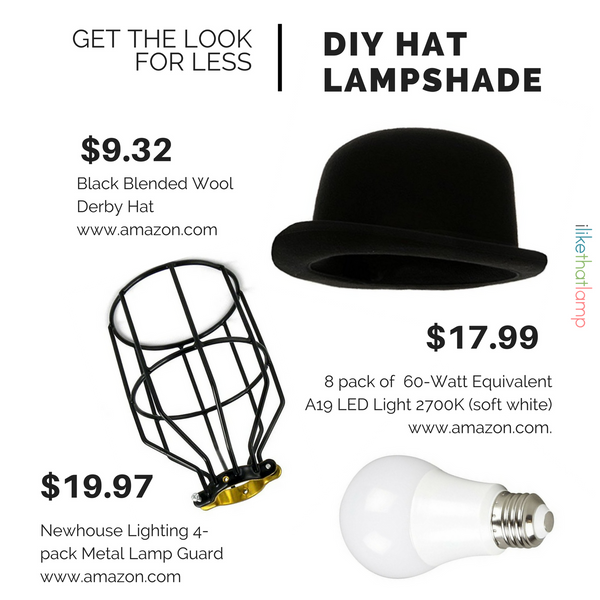
And now onto the coolest part of this lamp. Making a DIY hat lampshade isn’t difficult and it’s not expensive. We found a couple of cute hats online, all in different price ranges, so, if you were freaking out about where to get a bowler hat in the US, don’t worry, Amazon got you covered.
There are a few things to take into consideration though, like the quality of the hat, the actual dimensions and the material used on the interior. The quality will make a difference in how your hat lampshade will look at the end. You need to take into account the actual dimensions to make sure it will accommodate the bulb cage or lampshade frame and match the proportions of your overall lamp. We have a neat tutorial here that teaches you how to get the proportions of your lampshade right.
The most important dimensions to look for in a hat are the crown and the brim. The crown is the part of the hat that fits the head, while the brim is the stiff part that is attached to the base of the crown. Make sure the height and width of the hat will cover the bulb cage and socket completely.
Step 1: Take the bulb cage and attach it to your lamp base right under the socket.
*If you can find one, you can replace the bulb cage with a lampshade frame. There are different shapes and dimensions available, so make sure you take into account the height and width of your hat too. For a list of examples, check the list of supplies at the top of this post.
Step 2: Insert the bulb through the cage and into the socket. Remember that it is not recommended to use a light bulb with a wattage of over 60 watts due to the heat generated by the bulb. If you want to use Edison light bulbs with our wiring kits, we recommend using E26 or E27 LED bulbs due to their low heat and energy output. If you want to learn more about choosing a light bulb for your lamp, we put together a couple of tips here.
Step 3: Time to add the hat and finish your cool new lampshade. If you’re up for an extra challenge, you can also give the inside of your hat a makeover. You can either sew or glue a different color material on the inside or spray paint the existing fabric (make sure you use a paint that adheres to fabric and isn’t damaged by heat over time).
Attaching the hat to your bulb cage:
Get more DIY lamp inspiration on our Pinterest or browse our blog for more tutorials. We have step-by-step DIY guides to help you make a new drum lampshade, rewire any lamp or recycle a bottle into a cool table lamp.